
Choosing and Downloading a Disk Image
Naturally the first thing you'll need to do in order to get up and running is to download the image. We distribute these images as .iso files, which are commonly referred to as "disk images". We presently offer two different images: one for 32 bit systems (i386), and one for 64 bit systems (amd64).Regarding the functionality of the desktop, both images are virtually identical. The underlying differences between 32 bit and 64 bit are really beyond the scope of this guide; however, there are a few standard “rules of thumb” to help you choose which one is right for your system:
- 32 bit only has native support for a little over 3 GB of RAM, but can support more if necessary.
- 32 bit will run on much older hardware than 64 bit will.
- 64 bit is generally faster, but things such as Adobe Flash may suffer.
- Most processors made after 2008 will support 64 bit.
- Most desktop users will not likely see any drastic performance differences between the two.
- Consensus opinion is usually that 32 bit is a tiny bit more stable than 64 bit.
Direct Download
Depending upon your connection speed, the download may finish in as little as a few minutes. Peppermint disk images are generally smaller than most full featured desktop operating systems.For additional reading on the differences between 32 bit and 64 bit, Ubuntu has this nice Community Documentation Page that covers the topic in more detail.
Downloading via Torrent
For those wishing to download the ISO images via Torrent, here are the Torrent links. If you don't know how to use Torrents or what a 'Torrent Client' is, please use the "Direct Download" links above.Checking the Integrity of the Image
When dealing with large or critical file downloads, it's often advised to check the integrity of the file. Fortunately this is easily done using any one of various programs such as md5sum which is available for most modern desktop operating systems, md5 on Apple OS X and most BSD variants, or FCIV for Microsoft Windows.Checking the integrity of the file is done for a couple of reasons. The first is that it guarantees that the file is not corrupt by checking it against a known value. The second is that it guarantees the file to be authentic and has not been tampered with by unknown third parties.
Conducting the integrity check with md5sum is quite simple. Open a terminal or command prompt in the directory where the disk image is and type “md5sum” followed by the file name. Refer to the image below:
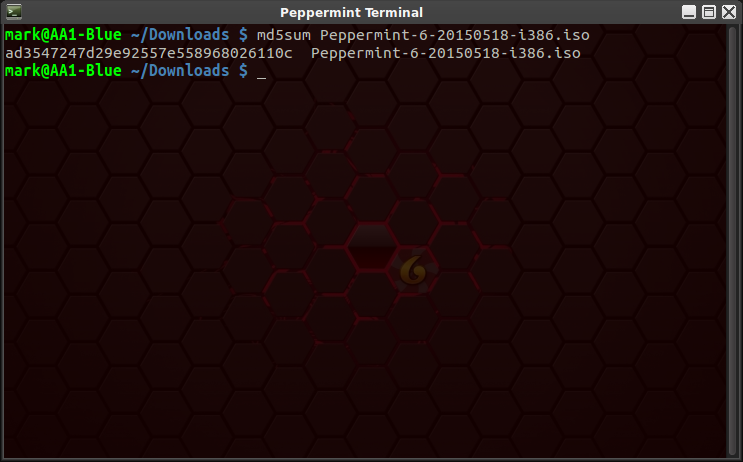
If
the result of the integrity check matches the md5 hash provided with
the download, then the download was successful and you’re ready to
create an installation medium. The md5 hashes for the currently
available Peppermint Six disk images are as follows:
Almost all modern computers can boot from a USB flash drive and this is the method that we most strongly recommend. When compared to a CD/DVD, bootable USB flash drives are significantly faster when it comes to live desktop performance and install time. Also many new laptops and netbooks simply do not have any type of optical drive installed, thus ruling out optical media altogether. If you must write the image to a CD/DVD, note that almost every application capable of writing to optical disks ("burning a CD" if you will) is capable of doing this and we strongly advise you to consult the application documentation specific to what you will be working with.
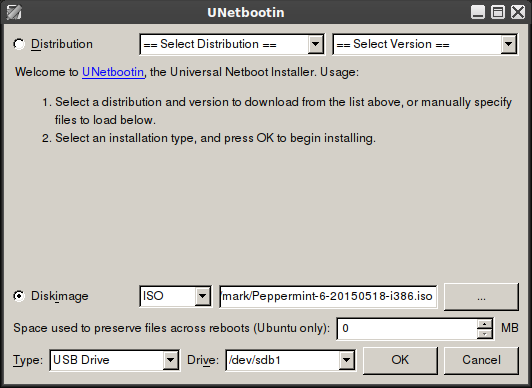
There are also a number of applications available for the specific purpose of creating bootable USB flash drives from .iso disk images. Of these we generally recommend one called UNetbootin as it's simple to use and is available for most common desktop operating systems including most Linux distributions, all supported editions of Microsoft Windows, and Apple OS X versions 10.5 and higher.
Once UNetbootin is installed, running the application and creating the bootable USB flash drive should be a fairly straightforward and intuitive process. In case you’re wondering, insert a USB flash drive, use the “Diskimage” option and navigate through the filesystem to find the disk image you want and then click “OK”.
Entering the BIOS setup differs between computer makes and models but is generally accessed using one of the following: F2, F10, F12, or Esc. Very rarely does the BIOS screen not tell you what it is. Some computers give you multiple options including full setup and a designated boot manager, which is ideal for this sort of work. As an example, my Lenovo ThinkPad has a "ThinkVantage" labelled button that enters the full BIOS setup, while F12 enters the simple boot manager. You do need to be quick about hitting the correct button as the BIOS screen rarely stays up for longer than a few seconds. If you enter the full setup, there is almost always a section that defines the boot order. If you need specific instructions for your machine, see the documentation that came with the computer or do a web search.
Once you have selected the correct device to boot from, follow the on screen instructions regarding saving and exiting (or simply hit "Enter" in the case of a boot manager) and the computer should now boot into the USB flash drive and present you with a UNetbootin screen. From here either wait a moment for the computer to automatically select the first option, or select any option from the list and hit "Enter". Ideally, the option you'll want to select is "Try Peppermint OS Live" which will take you to a fully functional desktop from which you can install the system.
For a modern operating system, Peppermint has what many people would call "very modest" system requirements. One of the original goals we set when we first started working on the project was to keep the system requirements low in order to offer the best possible performance to the widest variety of hardware. The absolute minimum required specs are as follows:
Other exceptions exist, some of which are documented and some of which aren't. If you're unsure about any potential incompatibility, please do some research before installing. During your research you may also want to look for incompatibilities between your hardware and either Ubuntu 14.04 or Linux Mint 17, as both of these share a lot of code with Peppermint Six.
We also have to strongly advise backing up any valuable or sensitive data before installing any operating system onto a computer that has one or more existing operating systems. There is always the risk that the install process could potentially interfere with these other operating systems, though this risk is extremely small.
Our final disclaimer here is that Peppermint does include some proprietary software by default, notably Adobe Flash. Peppermint OS, LLC (the company that builds and distributes Peppermint) is a licensed Adobe Flash distributor and depending upon where in the world you live, you may be subject to Adobe's End User License Agreement should you decide to run and install Peppermint. Naturally this means that if you're an open source purist you should probably turn back now.
There is also an option to install additional software from third parties. If you wish for things such as MP3 playback to work without issue, then it is advisable that you select this option.
If you already have other operating systems installed, the installer will recognize this and give you the option to install beside them. Other options here are to simply wipe the entire disk or to set up a more advanced partitioning table. If you're unfamiliar with setting up a partitioning table, it's advisable that you not select this option. Selecting either of the first two options will then present you with a screen where you can either confirm the changes or drag a selector to allocate space between Peppermint and other operating systems that may be installed. After completing this step, changes will be written to the disk and can not be undone. After the partition changes have been written to disk, the installation will continue.
When the installer finishes, Peppermint should now be successfully installed on your computer. You will be prompted with a dialog that will ask if you want to continue to test the live image or restart the computer. Note that any changes you make while still in the live image will be lost when you do restart so it is generally advisable to just go ahead and restart.
- 32 bit - ad3547247d29e92557e558968026110c
- 64 bit - 3b8dcaf0123e713fee3dd29aa6d8438c
Creating an Installation Medium
The next step is to take the disk image and write it to some form of external media so that you can boot the computer into that media and then install the operating system. Most commonly the installation medium consists of either an optical disk such as a CD or DVD, or a simple USB flash drive.Almost all modern computers can boot from a USB flash drive and this is the method that we most strongly recommend. When compared to a CD/DVD, bootable USB flash drives are significantly faster when it comes to live desktop performance and install time. Also many new laptops and netbooks simply do not have any type of optical drive installed, thus ruling out optical media altogether. If you must write the image to a CD/DVD, note that almost every application capable of writing to optical disks ("burning a CD" if you will) is capable of doing this and we strongly advise you to consult the application documentation specific to what you will be working with.
There are also a number of applications available for the specific purpose of creating bootable USB flash drives from .iso disk images. Of these we generally recommend one called UNetbootin as it's simple to use and is available for most common desktop operating systems including most Linux distributions, all supported editions of Microsoft Windows, and Apple OS X versions 10.5 and higher.
Once UNetbootin is installed, running the application and creating the bootable USB flash drive should be a fairly straightforward and intuitive process. In case you’re wondering, insert a USB flash drive, use the “Diskimage” option and navigate through the filesystem to find the disk image you want and then click “OK”.
It
will take UNetbootin a few minutes to finish up and then it will prompt
you to either reboot the computer or quit. The reboot option is nice if
you’ll be booting into the image on the computer you’re working with;
however, it’s just as simple to quit, eject the USB flash drive and move
it to another computer (note that bootable USB flash drives created
with UNetbootin are not bootable with Apple computers).
Peppermint Six is offered as hybrid ISO images. As a result, the images can be written directly to certain mediums (such as USB flash drives). Documentation on this and instructions on how to do so can be found here.
Peppermint Six is offered as hybrid ISO images. As a result, the images can be written directly to certain mediums (such as USB flash drives). Documentation on this and instructions on how to do so can be found here.
Booting Into Your Installation Medium
When you first power a computer on, the first thing you see is almost invariably what is called the BIOS screen. Generally this is the part where you see the computer manufacturer's logo (or the motherboard manufacturer's logo if you assembled the machine yourself) along with a few other things such as "F2 to Enter Setup" or something along those lines. What we want to do is to change the device that the computer is going to boot into as most systems will select the installed hard drive as their first choice.Entering the BIOS setup differs between computer makes and models but is generally accessed using one of the following: F2, F10, F12, or Esc. Very rarely does the BIOS screen not tell you what it is. Some computers give you multiple options including full setup and a designated boot manager, which is ideal for this sort of work. As an example, my Lenovo ThinkPad has a "ThinkVantage" labelled button that enters the full BIOS setup, while F12 enters the simple boot manager. You do need to be quick about hitting the correct button as the BIOS screen rarely stays up for longer than a few seconds. If you enter the full setup, there is almost always a section that defines the boot order. If you need specific instructions for your machine, see the documentation that came with the computer or do a web search.
Once you have selected the correct device to boot from, follow the on screen instructions regarding saving and exiting (or simply hit "Enter" in the case of a boot manager) and the computer should now boot into the USB flash drive and present you with a UNetbootin screen. From here either wait a moment for the computer to automatically select the first option, or select any option from the list and hit "Enter". Ideally, the option you'll want to select is "Try Peppermint OS Live" which will take you to a fully functional desktop from which you can install the system.
Before Installing
There are a few things you should know before installing Peppermint, notably some things such as system requirements and a couple of disclaimers.For a modern operating system, Peppermint has what many people would call "very modest" system requirements. One of the original goals we set when we first started working on the project was to keep the system requirements low in order to offer the best possible performance to the widest variety of hardware. The absolute minimum required specs are as follows:
- 256 MB of RAM
- Processor based on Intel x86 architecture
- At least 3 GB of available disk space
- 512 MB of RAM
- Processor based on Intel x86 architecture
- At least 4 GB of available disk space
- 1 GB of RAM
- x86_64 or amd64 compatible processor
- At least 4 GB of disk space
Other exceptions exist, some of which are documented and some of which aren't. If you're unsure about any potential incompatibility, please do some research before installing. During your research you may also want to look for incompatibilities between your hardware and either Ubuntu 14.04 or Linux Mint 17, as both of these share a lot of code with Peppermint Six.
We also have to strongly advise backing up any valuable or sensitive data before installing any operating system onto a computer that has one or more existing operating systems. There is always the risk that the install process could potentially interfere with these other operating systems, though this risk is extremely small.
Our final disclaimer here is that Peppermint does include some proprietary software by default, notably Adobe Flash. Peppermint OS, LLC (the company that builds and distributes Peppermint) is a licensed Adobe Flash distributor and depending upon where in the world you live, you may be subject to Adobe's End User License Agreement should you decide to run and install Peppermint. Naturally this means that if you're an open source purist you should probably turn back now.
Running the Installer
The installer in Peppermint can easily be launched by double clicking the "Install Peppermint" icon on the desktop. From here it will take you through a few steps ranging from language selection, to disk partitioning, to setting other system defaults such as timezone, keyboard layout, and username. Most of this is incredibly simple and warrants no explanation.There is also an option to install additional software from third parties. If you wish for things such as MP3 playback to work without issue, then it is advisable that you select this option.
If you already have other operating systems installed, the installer will recognize this and give you the option to install beside them. Other options here are to simply wipe the entire disk or to set up a more advanced partitioning table. If you're unfamiliar with setting up a partitioning table, it's advisable that you not select this option. Selecting either of the first two options will then present you with a screen where you can either confirm the changes or drag a selector to allocate space between Peppermint and other operating systems that may be installed. After completing this step, changes will be written to the disk and can not be undone. After the partition changes have been written to disk, the installation will continue.
When the installer finishes, Peppermint should now be successfully installed on your computer. You will be prompted with a dialog that will ask if you want to continue to test the live image or restart the computer. Note that any changes you make while still in the live image will be lost when you do restart so it is generally advisable to just go ahead and restart.
Quantum Binary Signals
ReplyDeleteProfessional trading signals sent to your cell phone daily.
Start following our signals right now & gain up to 270% per day.